![]()
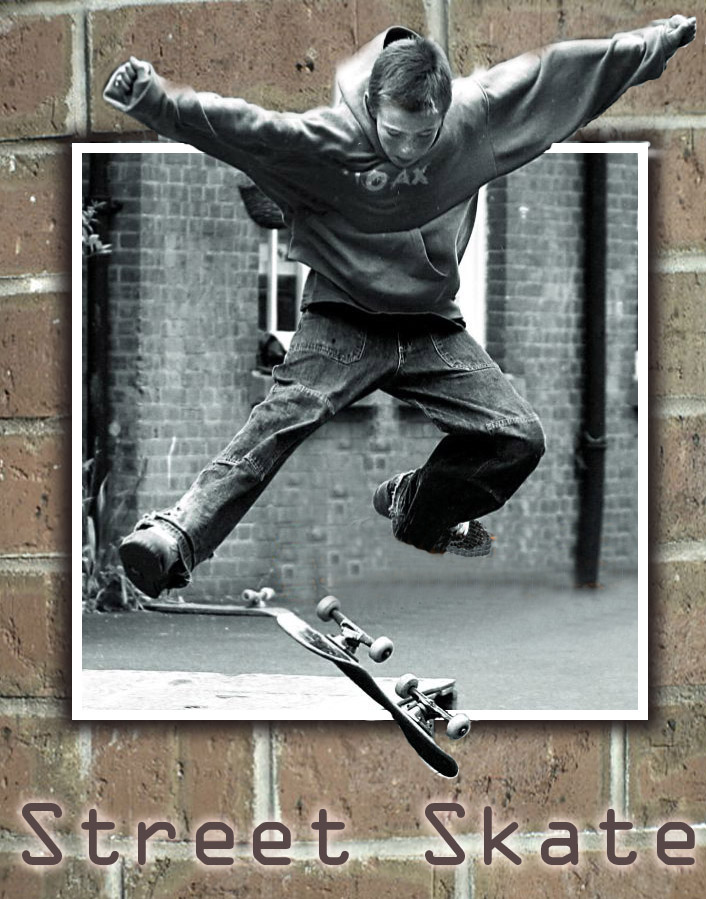
The pop out proejct will teach you how to make a two dimensional picture look three dimensional. For this project you are able to take almost any picture and make it popOUT. This will give the effect that the picture is three dimensional.
| Step 3 | Step 4 | Step 5 | ||
| Step 6 | Step 7 | Step 8 | Step 9 | Step 10 |
Use the Internet to find a good picture for a pop-out. The resolution of your picture should be at least 640 x 480 pixels. Save the picture.
Step 2: Open the Picture in Photoshop
Open the picture you selected in Photoshop and unlock the Background Layer (Double Click) and name the layer Picture. Save the file to your Assignments Folder as A10_popOUTpicture.

Step 3: Use Guides to Define your Main Picture Area
Turn on Rulers (View>Rulers) and set Guides to define the main area of your picture.
Step 4: Make a Selection and Save It
Use the Rectangle Marquee to make a selection within your guides and then save the selection to a channel called Main Picture Area (Select>Save Selection>Main Picture Area).

Step 5: Create a Layer Mask Using the Selection
With the main picture area still selected go to Layer>Layer Mask>Reveal Selection. Then paint on the Layer Mask with White (White Reveals) to bring back the portion of the picture that will be popping out. Use a brush with the hardness of 100% and use the Bracket keys to change the size of the brush to get into the smaller areas. You can use the X key to switch the Foreground Color between black and white. Make sure that you do a quality job.
Step 6: Make a Stroke Around the Main Picture Area
Make a new layer called Stroke and reload the selection (Select>Load Selection>Channel>Main Picture Area). Add a stroke (Edit>Stroke). Make sure you are on the Stroke Layer before you add the stroke.
Step 7: Remove the Part of the Stroke Where the Image is Popping Out
Add a Layer Mask to the Stroke Layer (Layer>Layer Mask>Reveal All). Make the selection inactive (Ctrl-D). Hide the Guides (View>Show>Guides). Paint on the Layer Mask with Black (Black hides) to hide the portion of the stroke where the image is popping-out.

Find an image for your background and save it to your images folder. Pick an image that complements your main picture. Open the picture in Photoshop and either Cut and Paste (Ctrl-A, Ctrl-C, Ctrl-V) it into your A10_popOUTpicture file or drag the layer into the file. Name the layer Background and reorder it so it is the lowest layer. If need be resize the image to fits your canvas (Edit>Transform>Scale). If you prefer to create a pattern or tile background like we did in the Jerry Rice sample you can find a small picture and define it as a Pattern (Edit>Define Pattern). Then create a new layer called Background in A10_popOUTpicture and fill the layer with the Pattern.
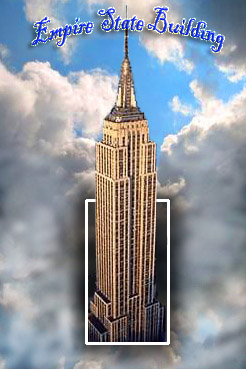
Create a new layer called Shadow and make sure it is the layer directly above your Background Layer. Reload the Selection (Select>Load Selection>Channel>Main Picture Area). Expand the selection (Select>Modify>Expand) by about 12 pixels and fill the selection with black. Deselect the black area (Ctrl-D) and perform a Gaussian Blur (Filter>Blur>Gaussian Blur>8.0).

Step 10: Add a Title to Your Picture
Use the type tool to add a title to your picture. Select a font that complements your picture. Double click on the right hand side of the Type layer to bring up the Layer Style palette and add some appropriate effects to your type.